
Email: tvt.thanhanphat@gmail.com Hotline: +84 985 359 866
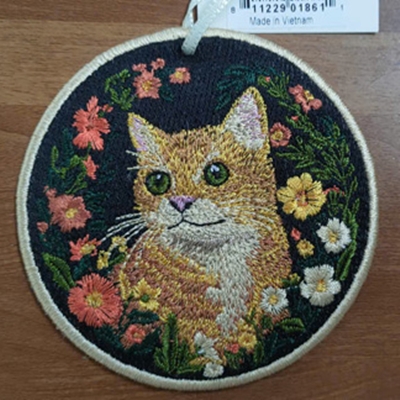
Home / our products / Computer Embroidery on a Round Frame - Cat & Flower
PRODUCT DETAILS
Design Guide: How to Craft Logos for Cap Embroidery Without Losing Details
Caps (Baseball caps, Snapbacks, Buckets) have long been an indispensable accessory in youth wardrobes, as well as highly favored products for corporate gifts and brand uniforms. However, translating a 2D graphic logo from a computer screen onto the curved surface of a finished cap is no simple technical task.
Many designers creating logos on design software (Illustrator, Photoshop) often forget that embroidery machines operate with needles and threads, not printing ink. As a result, when applied to a cap, the embroidery can suffer from bleeding text, lost lines, or fabric wrinkling. To ensure a perfect embroidered cap, Thanh An Phat Computerized Embroidery brings you the comprehensive design guide below.
1. Understanding Embroidery Placements and Dimension Limits on Caps
Unlike T-shirts or backpacks which offer broad, flat surfaces, caps have a highly restricted embroidery area and feature a significant curvature across the front crown.
Front Position (Crown): This is the center stage, directly catching the viewer's eye. The ideal size for a logo here is a maximum width of 12 - 14cm and a maximum height of 5.5 - 6cm. If a logo exceeds this height, the needles will run too close to the visor brim or the top eyelets, where the fabric structure curves sharply, easily causing image distortion or needle breakage.
Side Position (Panel): Usually reserved for secondary logos, icons, or small slogans. The best dimensions fit within 5cm (width) x 3cm (height).
Back Position (Above the closure): Commonly used for text, website links, or elongated linear logos. The appropriate size is 8 - 10cm (width) x 1.5 - 2cm (height).
2. Technical Specifications to Remember in Embroidery Logo Design
To guarantee that a computerized embroidery machine can replicate 100% of your concept without losing details, adhere strictly to these design rules:
2.1. Minimum Line Thickness (Stroke Weight)
For Flat Embroidery: Linework or logo outlines must have a minimum thickness of 1mm (about 3pt in Adobe Illustrator). If lines are too thin, the machine can only run a single stitch path (Single Stitch), making the design look faint and easily swallowed by the cap's fabric weave.
For 3D Pop Embroidery: To allow the foam backing to push the thread upward and create dimension, lines must be between 3mm and 10mm thick. If a line is narrower than 3mm, the needle penetrations will slice up the inner foam, failing to generate any pop effect.
2.2. Minimum Typography Size (Font Size)
Text included within the logo (slogans, brand names) on a cap should have a minimum height of 5mm.
Prioritize block, sans-serif fonts such as Arial, Helvetica, Montserrat... to allow smooth stitch paths. Strictly limit thin-serif fonts or highly intricate, looping script fonts. When scaled down for embroidery, these delicate lines blend together into a cluttered clump of thread, rendering the text unreadable.
2.3. Negative Space and Clearance (Spacing)
The negative space between two design lines or adjacent letters must be at least 1mm. If the spacing is closer than this, the pull tension of the thread will draw the two elements together into a single unit, losing your original design clearance.
3. Simplifying the Color Palette
Industrial embroidery machines operate by swapping out different colored thread spools. Therefore:
Keep your logo limited to 1 to 4 primary colors. The fewer colors a logo uses, the more seamless, crisp, and cost-effective the processing will be.
Avoid Gradient Effects: Computerized embroidery cannot blend colors smoothly like digital inkjet printing. To display shading or depth, an embroidery factory must use blending techniques by interlocking different colored thread paths. This technique looks excellent on large panels but easily turns into a tangled mess on the small area of a cap.
4. Thanh An Phat - Experts in Cap Embroidery Digitizing Meeting US Export Standards
Designing a beautiful logo on screen is only 50% of the journey; the remaining 50% lies in the factory's capability to digitize the embroidery file (Punching).
At Thanh An Phat Computerized Embroidery, we operate specialized cap embroidery systems featuring modern cylindrical rotary hoops, paired with an experienced team of file programming technicians. Before launching bulk production, Thanh An Phat always:
Carefully reviews the customer's design file and provides technical advice to adjust thin strokes and small text for optimal machine performance.
Executes a physical sample sew-out on the actual cap material so the customer can check the structure, form, and crispness.
Ensures the embroidery hugs the curved front crown seamlessly, lying flat, smooth, perfectly centered, and distortion-free.
Thanh An Phat Computerized Embroidery - Quality Creates The Difference
FEATURED PRODUCTS
YOU MAY ALSO LIKE
Address: K1-100 Western Land Villa Complex, Block 6, Thoi Hoa Ward, Ho Chi Minh City
Hotline: (+84) 985 359 866
Email: tvt.thanhanphat@gmail.com
With our mordern machinery and a team of experienced technicians, we are proud to be a strategic partner of many major domestic companies and a direct exporter of decorative embroidery and embroidered gifts to the U.S. market.
THANH AN PHAT EMBROIDERY CO., LTD.
Address: K1-100 Western Land Villa Complex, Block 6, Thoi Hoa Ward, Ho Chi Minh City
Hotline: (+84) 985 359 866
Email: tvt.thanhanphat@gmail.com
THANH AN PHAT EMBROIDERY CO., LTD.
Địa chỉ: K1-100 Western Land Villa Complex, Block 6, Thoi Hoa Ward, Ho Chi Minh City
Business Registration Certificate No. 3703446876 - Issued by the Department of Planning and Investment of Ho Chi Minh City on March 5, 2026
Content Manager: Hoang Thi Huong
@ Copyright by THANH AN PHAT EMBROIDERY CO., LTD.. Designed by Vietnam Yellow Pages.
.png)

